


•
3:06 PM
Supplies Needed:
Tube of choice, I am using andrea Ale found at SATC
Scrap kit Summer Lolita by Tasha’s Playground, also found at SATC
Eyecandy 4000 - Jiggle (for water movement)
My Supplies (mask, word art and frame template) here
Mask of choice
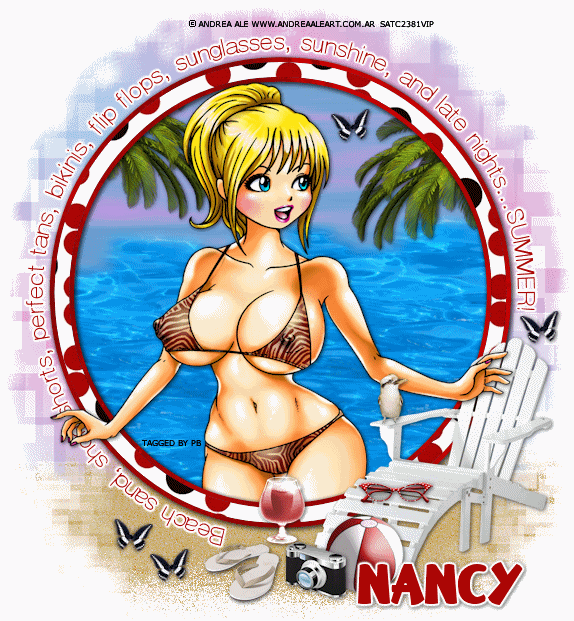
Open a new image, 700 x 700 with a white background.
Copy and paste the frame template as a new layer. Go to selections - Select All - Float - Defloat.
Copy and paste a paper of choice above the frame layer, position to your liking. Go to Selections - Invert and hit delete on the keyboard. Delete the frame template.
Still on the frame layer, go to Selections - Select All - Float - Defloat. Back to Selections - Modify - Select Selection Borders and use 5. Copy and paste a paper of choice below the frame. Go to Selections - Invert and hit delete on the keyboard. Merge the two frame layers. Apply a drop shadow.
Click inside the frame with the Magic Wand, go to Selections - Modify - Expand by 5.
Add a new layer below the frame, make a gradient out of two colors for the sky, flood fill this layer. Go to Selections - Invert and hit delete on the keyboard.
Open Water, copy and paste as a new layer above the gradient. Place about half way down inside the circle. Duplicate, mirror and flip. Place at the bottom. You should have “water” covering the gradient except for at the top, see my tag if needed. DO NOT apply a drop shadow to the water layers. Merge the two water layers. Erase any of the water outside the frame.
Copy and paste the tube as a new layer. Place in the center of the frame, resize if needed. Apply a drop shadow. Erase any of the tube outside the frame you do not want showing.
Open Palm Tree, resize by 80 percent. Copy and paste as a new layer. Place inside the frame neat the top on the right hand side. Apply a drop shadow. Duplicate, and place on the left hand side, erase any of the tree that’s outside the frame.
Copy and paste the mask layer above the white background. You can also mask your own mask in desired. Position more at the top then at the bottom.
Copy and paste the word art around the outside of the frame.
Open Sand, copy and paste at the bottom of the frame, this layer should be above the mask layer, apply the mask to this layer, erase ant of the sand you don’t like.
Open Chair, resize by 60 percent. Copy and paste as a new layer, place at the bottom on the right hand side. Apply a drop shadow.
Open Glasses, resize by 25, percent. Copy and paste as a new layer. Place on top of the chair to your liking. Apply a drop shadow.
Open Beach Ball, resize by 40 percent. Copy and paste as a new layer. Place at the end of the chair. Apply a drop shadow.
Open Camera, resize by 40 percent, copy and paste as a new layer. Place in front and to the left of the beach ball. Apply a drop shadow.
Open Drink, resize by 30 percent. Copy and paste as a new layer. Place behind the camera. Apply a drop shadow.
Open Flip Flops, resize by 50 percent, copy and paste as a new layer. Place in front and to the left of the drink. Apply a drop shadow.
Open Bird, resize by 25 percent. Copy and paste as a new layer. Place on the arm of the chair, apply a drop shadow.
Open Butterfly, resize by 30 percent. Copy and paste as a new layer. Place to your liking, apply a drop shadow. Duplicate as many as you like. I also rotated mine by 8 degrees left.
Add any copyrights and your name. Crop, resize if desired. If you are not animating than save as a PNG (close background layer first).
For Animation…..
Select the WATER layer, duplicate 2 times for a total of 3 water layers. Leave the bottom water layer the way it is, select the middle water layer, go to the Plugins and find Eyecandy 4000 - Jiggle leave all settings like they are and hit Random Seed a few time, apply. Do the same thing with the top water layer, hitting Random Seed a few times.
You should have 3 water layers and top two should have been Jiggled…lol. Close off the top two jiggled layers leaving only the bottom water layer (all other layers should be open as well). Copy MERGED…..
Open Animation Shop, and paste as a new animation, go back to PSP and close the bottom layer of water and open the middle one. Copy Merged again, back in Animation Shop paste after current frame. One more time go back to PSP, close the middle water layer and open the top one, copy MERGED. In Animation Shop paste after Current Frame.
Check the animation, if its to choppy or fast change the Frame Properties to something you like, I used 28.
Once your happy with the movement of the water save as a .gif.
All done!! Pretty easy huh? Thank you for trying one of my tuts, I hope you have enjoyed yourself and I look forward to having you come back again! I would love to see what you have created.
Summer
|
0 comments :