


•
2:31 PM
Supplies
Needed:
Tube: I'm
using one by Vi Nina found at S&Co
Template: Candy
Kisses2 by Flaminsal found here
Scrap Kit: Tis
The Season by Scraps Dimensions found here
(I was informed that the kit is no longer available so you can get it here)
(I was informed that the kit is no longer available so you can get it here)
Plugin: Xero
– Porcelain (optional)
Plugin:
Filters Unlimited 2 – Special Effects Dark Blur and Shiver (optional)
Plugin: MuRa’s
Meister – Wallpaper (rotate) Optional
Plugins: Eye
Candy 4000 – Gradient Glow (optional)
My Supplies:
Word art, mask layer and backgrounds (optional) found here
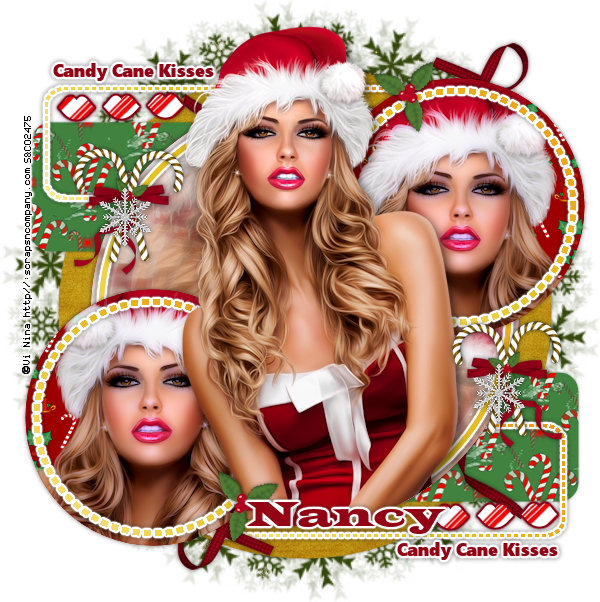
Open the
template, duplicate and close the original. Open the background layer at the
bottom.
Select Large
Circle, go to Selections - Select All - Float - Defloat.
Copy and
paste a paper of choice above the selected layer. Position to your liking. Go
to Selections - Invert and hit delete on the keyboard. Delete the template
layer. Apply a drop shadow.
Repeat the above steps for the remaining
template layers. If you like you can use the backgrounds that I shared with my
supplies for the long rectangles.
Select the background for the circle in
the lower left hand side, go to Selections - Select All - Float - Defloat. Copy
and paste the tube as a new layer above the background. Position to your
liking. Go to Selections - Invert and hit delete on the keyboard. Do the same
thing for the circle in the upper right hand side, you may want to mirror the
tube. Select one of the tubes and apply
Xero - Porcelain using the default settings, do the same for the remaining
tube. You can use any plugin you like for here if you prefer that instead.
Copy and paste the tube as a new layer above
the large circle in the center. Position to your liking. Go to Plugins – MuRa’s
Meister – Wallpaper (rotate), I used these setting:
Random
Wraparound
Normal
Number:20
Select the background for the large circle
in the center, go to Selections - Select All - Float - Defloat. Select the
wallpaper layer, go to Selections – Invert and hit delete on the keyboard. Go
to Plugins – Filters Unlimited – Special Effects – Blur Darkness, using the
default settings. Using the same Plugin apply Shiver, you can find this in the
Special Effects as well.
Open Candy Cane1, resize by 20 percent.
Copy and paste as a new layer. Place in the upper left hand side on the edge of
the large circle. Apply a drop shadow. Duplicate and mirror, place in the lower
right hand side on the edge of the large circle.
Open Holly2, resize by 15 percent. Copy
and paste as a new layer. Position behind the circle layers on the left hand
side. Apply a drop shadow.
Open Ribbon04, resize by 60 percent,
mirror. Copy and paste as a new layer. Position on the right hand side behind
the small circle layer. Apply a drop shadow. Duplicate and flip, do the same
thing for the left hand side.
Open snowflake1, resize by 20 percent.
Copy and paste as a new layer. Position to your liking, I placed mine near the
candy canes. Apply a drop shadow. You can add as many as you like.
Open the mask layer included in my
supplies. Copy and paste as new layer. Move this to the layer right above the
background layer.
Open word art included in my supplies,
copy and paste as a new layer. Position above the dotted line on the left hand
side. Duplicate and do the same for the dotted line on the right.
Add any copyrights and your name. Crop,
resize if desired. Save as a PNG (close background first).
Thank you for trying one of my tuts, I
hope you have enjoyed yourself and I look forward to having you back here
again!! I would love to see what you have created.
4 comments :
Hello Nancy, Love this tutorial, but unfortunately the Scrap Kit is no longer available. Any chance of sharing this, so the tutorial can be worked. Regards, Beryl
Thank for letting me know, will will find a link above for the kit.
Thank you so much! I enjoyed your tutorial!
Thank you Gayle, happy you liked it!!