Author: Precious Beauties
• 5:12 PM


Supplies Needed:
Tube: I am using one of Ismael Rac which has since closed
Scrap kit: Santa’s Coming by Tracy F Designz (I uploaded the kit to my Box account, the site is no longer available) found here
Template: kktempz39 by Kandi Kissez Designz (I uploaded the kit to my Box account, the site is no longer available) found here
My Supplies: Little snowflakes found here
Eye Candy 4000 – Gradient Glow (optional) 

Open the template, duplicate and close the original. Delete the copyright, and bar set. Resize all layers by 90%.

Select pink rectangle layer, go to Selections - Select All - Float - Defloat.

Copy and paste a paper of choice above the selected layer. Position to your liking. Go to Selections - Invert and hit delete on the keyboard. Delete the template layer. Apply a drop shadow.

Repeat the above steps for the remaining template layers.

I then applied a Gradient glow using Eye Candy 4000 to the snowflakes, this of course is optional. 

Copy and paste the tube as a new layer, position inside the frame on the left hand side. Resize if needed. Place to your liking. Apply a drop shadow. Erase any of the tube outside of the frame. 

Repeat the last steps for the frame on the right, my tube is bigger in this frame. 

Open the snowflakes I provided, copy and paste a new layer. Place around the template to your liking, I placed some on top of the tubes and below on the bottom layers of the template. See my tag if you would like a reference. 

Duplicate the snowflakes that were on the template, move to the right. Don’t forget to flip a few. You can duplicate as many as you like.

Open Bow3, resize by 30% and mirror. Copy and paste as a new layer. Place at the top where the two frames meet. Apply a drop shadow.

Open Holly, resize by 40%. Copy and paste as a new layer. Place in the bottom left corner of the frame on the left. Apply a drop shadow. 

Open Candycane1, resize by 40%. Copy and paste as a new layer. Place on the right hand side overlapping the frame. Apply a drop shadow. Duplicate and place under the holly.

You may want to move the snowflakes around a little or add a few more over the elements you added.

Add any copyrights and your name. Crop, resize if desired. Save as a PNG (close background first).

Thank you for trying one of my tuts, I hope you have enjoyed yourself and I look forward to having you back here again!! I would love to see what you have created.
Author: Precious Beauties
• 4:18 PM


Supplies Needed:

Tube: I am using one of Jose Cano, purchased from PTE (now closed)

Scrap kit: The December BlogTrainAd 2010 by Charlie found here

Template: BP_template 89 by Becky’s Creations (could not be found so you can download it from my Box) here

Eye Candy 4000 – Gradient Glow (optional)


Open the template, duplicate and close the original. Delete the copyright and TOU.


Select Frame Fill, go to Selections - Select All - Float - Defloat.


Copy and paste a paper of choice above the selected layer. Position to your liking. Go to Selections - Invert and hit delete on the keyboard. Delete the template layer. Apply a drop shadow.


Repeat the above steps for the remaining template layers.


I then applied a Gradient glow using Eye Candy 4000 to the dotted frame and snowflakes, this of course is optional.


Open the file that has the gold stars, using the Freehand Selection Tool, select and copy the stars. Paste them into the template. Resize to your liking, position them above the background for the rectangle. Apply a drop shadow. Duplicate as many as you like placing them around the background. You can also use different sizes if preferred. 


Copy and paste the tube as a new layer, resize if needed. Move this layer just below the frame for the rectangle. Place on the left hand side so the circle is not fully blocking the tube. Apply a drop shadow. Erase any of the tube that is sticking out below the frame.


Open the file that has the silver stars, using the Freehand Selection Tool, select and copy the stars. Paste them into the template. Resize to your liking, position them above the background for the circle. Apply a drop shadow. Duplicate as many as you like placing them around the background. You can also use different sizes if preferred. 


Copy and paste the tube as a new layer, resize if needed. Move this layer just below the frame for the circle. Position to your liking. Apply a drop shadow. Erase any of the tube that is sticking out below the frame. I used a smaller tube for the circle, it’s totally up to you.


Open the file containing the green and red ribbon, using the Freehand Selection Tool, select and copy the green and then the red ribbon. Paste onto the template, resize to your liking. I resized the red a little smaller than the green. Place in the left hand corner of the circle frame overlapping the tag. Move the red one on top of the green. Apply a drop shadow to both ribbons.


Open the file with the poinsettia, using the Freehand Selection Tool, select and copy the poinsettia. Paste it into the template. Resize to your liking, position over top the ribbon, on the edge of the circle frame. Apply a drop shadow.


Add any copyrights and your name. Crop, resize if desired. Save as a PNG (close background first).

Thank you for trying one of my tuts, I hope you have enjoyed yourself and I look forward to having you back here again!! I would love to see what you have created.

Author: Precious Beauties
• 3:42 PM


Supplies Needed:
Tube: I'm using one by Keith Garvey purchased at MPT (since closed)
You can buy his art here
Template: Pbs-Template146 by Punky Butts found here
Scrap Kit: Christmas Challenge by Creative Misfits found here
Mask: Of choice 

Open the template, duplicate and close the original. Delete the copyright and resize canvas by 700 x 700.

Select Oval, go to Selections - Select All - Float - Defloat.

Copy and paste a paper of choice above the selected layer. Position to your liking. Go to Selections - Invert and hit delete on the keyboard. Delete the template layer. Apply a drop shadow.

Repeat the above steps for the remaining template layers.

Copy and paste the tube as a new layer, position to your liking inside the frame on the top left hand side. Apply a drop shadow. Select the background layer, go to Selections – Select All – Float – Defloat. Select the tube layer, go to Selections – Invert, hit delete on your keyboard.

Repeat the above steps for the remaining squares and the frame at the bottom. Don’t forget to mirror your tube once in a while. When you’re finished apply some plugins to your tubes.

Open Christmasbow _5, resize by 30 percent. Copy and paste as a new layer. Position at the top of the square on the right hand side. Apply a drop shadow.

Open Christmasbow_6, resize by 30 percent. Copy and paste as a new layer. Position overlapping the squares on the left hand side. Apply a drop shadow.

Open Christmasribbon_3, copy and paste as a new layer. Position at the bottom of the frame. Move behind the frame layers. Apply a drop shadow.

Copy and paste a paper of choice above the white background layer. Apply your mask of choice to this layer. Delete mask layer and merge group.

Add any copyrights and your name. Crop, resize if desired. Save as a PNG (close background first).

Thank you for trying one of my tuts, I hope you have enjoyed yourself and I look forward to having you back here again!! I would love to see what you have created.
Author: Precious Beauties
• 3:02 PM


Supplies Needed:
Tube of choice, close-up and full, I am using Elisa Chatzoudis found at PTE (closed)
Scrap kit: Sinfully Delicious Christmas by Randy's Sin (site can no longer be found so you can find the kit uploaded to my Box, all copyrights belong to the original designer) found here
Template: Kan-Dee Temp 5 (could not find on the blog so you can find it on my Box) found here
Mask: My Supplies found here

Open the template, duplicate and close the original. Delete the copyright and snowflakes. Resize all layers by 90%. Resize canvas by 700x700.

Open a paper of choice, select the oval layer, go to Selections - Select All - Float - Defloat. Copy and paste the paper above this layer, go to Selections - Invert and hit delete on the keyboard. Go to Selections - Select None.

Repeat this for all layers. 

Select the layer Stamps bg, copy and paste your tube above this layer. Place to your liking on the left. Apply a drop shadow. Erase or delete any of the tube that is outside the two frames. Repeat this for the two frames on the right. Change the Blend Mode on the left to Screen and change the Blend Mode to Multiply on the right.

Apply a drop shadow to all layers.

Open element Tree 3, resize by 40%. Copy and paste as a new layer, place in the center of the template. Apply a drop shadow.

Open element Tree 3, resize by 40%. Copy and paste as a new layer, place in the center of the template. Apply a drop shadow.

Open element Jungle Bell 1, resize by 20%. Copy and paste as a new layer, place on the right hand side above the top red strip. Erase part of the ribbon to appear its hanging. Apply a drop shadow. Duplicate and mirror and repeat on the left hand side.

Open element Star, resize by 10%. Rotate right by 15 degrees. Copy and paste as a new layer, place to your liking. Duplicate a many time as desired. Apply a drop shadow.

Resize the Star element to your liking to place on top of the tree. Apply a drop shadow.

Copy and paste the tube as a new layer, position in front of the tree to your liking. Apply a drop shadow.

Open element Gift 4, resize by 15%. Copy and paste as a new layer, place behind the tube in front of the tree on the left hand side. Apply a drop shadow.

Open element Gift 1, resize by 15% and mirror. Copy and paste as a new layer, place behind the tube in front of the tree on the right hand side. Apply a drop shadow.

Open element Gift 11, resize by 15%. Copy and paste as a new layer, place behind the tube in front of the tree on the left hand side. Apply a drop shadow.

Open element Candle Set, resize by 20%. Copy and paste as a new layer, place on the left hand side behind the word art and beside the tube. Apply a drop shadow. Duplicate, mirror and do the same for the right hand side.

Open element Ornament 1 and 2, resize by 8%. Copy and paste as a new layer, place to your liking around the bottom of the template, duplicate as many as you like mirroring some. Apply a drop shadow.

Copy and paste the mask layer above the white background layer. Position to your liking. You can also use on of your own.

Add any copyrights and your name. Crop, resize if desired. Save as a PNG (close background first).

Thank you for trying one of my tuts, I hope you have enjoyed yourself and I look forward to having you come back again!

Author: Precious Beauties
• 4:41 PM
Supplies Needed:
Tube of choice, I am using Misticheskaya found here
Scrap kit: Christmas Time by Addictive Pleasures found here
Template: Temp 40 by Scrapity Scraps and More found here
Mask: 26 by Vix found here
MuRa's Meister - Copies (optional)

Open the template, duplicate and close the original. Delete the copyright.

Open a paper of choice, select Big Circle layer, go to Selections - Select All - Float - Defloat. Copy and paste the paper above this layer, go to Selections - Invert and hit delete on the keyboard. Go to Selections - Select None.

Repeat this for all remaining layers.

Apply a drop shadow to all layers.

Copy and paste your tube as a new layer, go to Effects - Plugins - MuRa's Meister - Wallpaper. These are the settings I used:
Random - Wraparound - Blend Mode
Number - 18
BG Color - White
Rest set on default

Select the big square layer, go to Selections - Select All - Float - Defloat. Select the tube layer, go to Selections - Invert and hit delete on the keyboard. Lower Opacity to 53.

To add the text, type out a phrase or greeting of your liking, convert to Raster layer. Go to Effects - Plugins - MuRa's Meister - Copies - Tiling Angle
These are the settings I used:
Line - Tile - Blend Mode
BG Color - White
Tile Gap - 2
Rest set on default

Select the long rectangle in the center of the template, go to Selections - Select All - Float - Defloat. Select the word layer, go to Selections - Invert and hit delete on the keyboard. Repeat this with the two small rectangles on the right hand side.
     
Copy and paste tube as a new layer, resize if needed. Apply a drop shadow.

Open Candy cane, resize by 30%, mirror. Copy and paste as a new layer, place behind the tube on the lower left hand side.

Open Star 2, resize by 35%. Copy and paste as a new layer, place to your liking. Duplicate a many time as desired. Apply a drop shadow.

Open Flowers, copy and paste as a new layer, above the white background layer to your liking. Duplicate, flip, and mirror. Apply a drop shadow.

Open Berry, resize by 20%. Copy and paste as a new layer, place near the bottom of the template. Duplicate a many time as desired. Apply a drop shadow.

Open Ribbon, resize by 40%. Copy and paste as a new layer, place at the bottom behind the tube and to the left. Duplicate, move to the top and to the right, place behind the square with the tube wallpaper. Apply a drop shadow.

Open Ribbon 4, copy and paste as a new layer, place in the center of the template just above the long rectangle. Apply a drop shadow.

Open Bauble 5, resize by 30%. Copy and paste as a new layer, duplicate so you have two, place on top of the frame on the right hand side. Erase part of the ribbon so it appears to be hanging.
Move the remaining bauble to the left. Place it so it appears to be hanging from the white and red ribbon. Apply a drop shadow.

Open Sparkles, copy and paste as a new layer, place in the center and to the left.

Copy and paste a paper of choice above the white background. Apply the mask to this layer. Delete the mask layer and merge group.

Add any copyrights and your name. Crop, resize if desired. Save as a PNG (close background first).

Thank you for trying one of my tuts, I hope you have enjoyed yourself and I look forward to having you come back again!
Author: Precious Beauties
• 4:18 PM
Supplies Needed:
Tube of choice, I am using Elias Chatzoudis found here
Scrap kit: Glittery Glass Xmas by Designs by Vaybs found here
Mask: Vix 301 found here
My Supplies: Glass found here

Open Glittery Glass Xmas frame 4, duplicate and close the original. Add new layer, move to the bottom and flood fill with white. Resize the canvas 700x700.

Choose a paper of choice, place below the frame layer.

Select the Magic Wand, choose the frame layer and click inside the large star. Go to Selections - Modify - Expand by 5. Choose the paper layer, go to Selections - Invert and hit delete on the keyboard.

Repeat this for the remaining stars.

Copy and paste the tube into the large star. Position to your liking, apply a drop shadow. Delete any of the tube that's out past the frame. Do this for the two smaller stars as well. The tubes Blend Mode was changed to Hard Light and the Opacity was changed to 63.

Open Holly 2, resize by 40%. Place to your liking, apply a drop shadow. Duplicate and place on the left hand side.

Open Overlay, copy and paste above the background layer. Select the Magic Wand, select the frame layer, click inside each of the stars while holding down the Shift key. Go to Selections - Modify - Expand by 5. Chose the Overlay layer, Go to Selections - Invert - Hit delete on the keyboard.

Copy and paste the Glass from my supplies, place below the frame layer.

Open Tags 2, resize by 60%. Place at the bottom of the large star, apply a drop shadow.

Open a paper of choice, copy and paste above the white background layer. Apply the mask to this layer. Delete the mask layer and merge group.

Add any copyrights and your name. Crop, resize if desired. Save as a PNG (close background first).

Thank you for trying one of my tuts, I hope you have enjoyed yourself and I look forward to having you come back again!
Author: Precious Beauties
• 8:35 PM
Supplies Needed:
Tube: I am using Misticheskaya found at PFD
Template: Snowflakes by Dee found here
Scrap kit: Misfit Christmas found here (Melissa)
Plugin: Eye Candy 4000 – Gradient Glow (optional)

Open the template, duplicate and close the original. Delete the copyright, and overlay, resize canvas by 700 x 700.

Select right blue rectangle, go to Selections - Select All - Float - Defloat.

Copy and paste a paper of choice above the selected layer. Position to your liking. Go to Selections - Invert and hit delete on the keyboard. Delete the template layer. Apply a drop shadow.

Repeat the above steps for the remaining template layers.

Open Snowflake Circle, Copy and paste as a new layer. Place behind the circle in the center of the template. Apply a drop shadow. I apply a white gradient glow to this layer. You can use whatever you like.

Open Dangling Snowflakes, copy and paste as a new layer. Position behind the circle frame on the center of the template. Position to your liking, apply a drop shadow. Select the background for the circle. Go to Selections – Select All – Float – Defloat. Select the dangling snowflakes layer, go to Selections – Invert and hit delete on the keyboard.

Open Button 3, resize by 25 percent, flip. Copy and paste as a new layer. Position on top of the square frame on the left hand side, place so its overlapping the small rectangle. Apply a drop shadow. Duplicate and place on the right side doing the same thing.

Open Doodle 2, mirror, copy and paste as a new layer. Position below the template layers. Mirror and flip, place at the bottom of the template. Apply a drop shadow if you like.

Open Sparkledust, copy and paste as a new layer. Position below the template layers. Place to your liking and apply a drop shadow. Duplicate, place around the template, so this as many times as needed.

Open Bow4, resize by 30 percent. Copy and paste as a new layer. Place on the left hand side of the large circle frame. Apply a drop shadow.

Add any copyrights and your name. Crop, resize if desired. Save as a PNG (close background first).

Thank you for trying one of my tuts, I hope you have enjoyed yourself and I look forward to having you back here again!! I would love to see what you have created.
Author: Precious Beauties
• 8:49 PM
Supplies Needed:
Tube: I am using one from Danny Lee, you can find this tube here
Scrapkit: Hot Drink by Design by Joan, you can find this kit here
My supplies: Frame template, here (you can always use another one
Eye Candy 5 – Impact – Bevel

I purchased both the tube and kit a long time ago, then my computer went nuts and I lost both. I finally got them back and thought I better do something with them NOW! The kit and tube both are named “Hot Drink” in case you can’t find it.

Open a new image 700 x 700. Add a new layer and flood fill with white, copy and paste the frame template as a new layer. Go to Selections – Select All – Float – Defloat. Copy and paste a paper of choice above the frame. Hit delete on the key board. Apply a drop shadow.

(you can apply a bevel to the frame if you like) I used these setting for mine:
Eye Candy 5 Impact Bevel
Bevel Width: 39
Bevel Height: 20
Smoothness: 78
Bevel Placement: Inside Selection
Shade Interior: Checked
Bevel Profile: Button

Copy and paste a paper of choice below the frame, select the frame layer, using the Magic Wand click on the outside of the frame. Go to Selections – Modify – Expand by 5. Select the paper again and hit delete on the keyboard.

Open the tube, copy and paste as a new layer. Resize if needed and place to your liking. Apply a drop shadow.

Open Elem 3, resize by 85%. Copy and paste as a new layer. Place behind the frame background. Apply a drop shadow if desired.

Open Elem 51, resize by 20%. Copy and paste as a new layer. Place at the top, in the center of the frame. Apply a drop shadow.

Open Elem 47, resize by 40%. Copy and paste as a new layer. Place below the frame background, position so the some of the branches are seen out past the frame on the left-hand side. Apply a drop shadow. Duplicate as many as you like placing along the edge.

Open Elem 56, resize by 50%. Copy and paste as a new layer. Position on the left-hand side on top of the frame. See my tag for reference if needed. Apply a drop shadow.

Open Elem 65, resize by 20%, mirror. Copy and paste as a new layer. Place near one of the top limbs of the branch you just added. Apply a drop shadow.

Open Elem 35, resize by 60%. Copy and paste as a new layer. Position on top of the branch. Apply a drop shadow. Duplicate if desired and place around the branch and frame.

Open Elem 45, resize by 30%. Copy and paste as a new layer. Place on the left-hand side covering the bottom of the branch. Apply a drop shadow.

Open Elem 20, resize by 20%. Copy and paste as a new layer. Place at the top of the tree you just added. Apply a drop shadow.

Open Elem 7, resize by 25%. Copy and paste as a new layer. Place in front of the tree. Apply a drop shadow.

Open Elem 55, I resize one by 20% and another by 15%. Copy and paste the larger one as a new layer. Place in front of the pile of snowballs. Apply a drop shadow. Copy and paste the smaller one as a new layer. Leave it for now we will return to it in a bit.

Open Elem 23, resize by 60%. Copy and paste as a new layer. Place beside the tree, position a little off to the right and down a little lower. Apply a drop shadow. Move the smaller gift to the right of the lantern. Apply a drop shadow to the gift if you already haven’t.

Open Elem 27, resize by 25%. Copy and paste as a new layer. Place between the pile of snowballs and lantern. Apply a drop shadow.

Open Elem 4, resize by 15%. Copy and paste as a new layer. Place in front of the lantern and drink. Apply a drop shadow.

Open Elem 25, resize by 60%. Copy and paste as a new layer. Place near the small gift and candy. Apply a drop shadow.

Open Elem 66, resize by 15%. Copy and paste as a new layer. Place off to the right-hand side a little. See my tag for reference if needed. Apply a drop shadow.

Open Elem 53, resize by 50%. Copy and paste as a new layer. Place around the outside of the frame. Move this layer below the frame background. Duplicate as many times as you need.

Close off these layers: frame, frame background, purple décor, white background, pine wreath, the tube, the bow and bells, both birds, the lantern and small gift. Right click at the top of the tag, copy merged. Paste as a new layer, mirror. Position on the right-hand side on top of the frame. Place this a little higher than the left side. See my tag for reference if needed.

Open all layers you have closed. Reposition the merged layer on the right-hand side if needed. Also, you may need to move the little bird at the bottom to your liking again.

Add any copyrights and your name. Crop, resize if desired. Save as a PNG (close background first).

Thank you for trying one of my tuts, I hope you have enjoyed yourself and I look forward to having you back here again!! I would love to see what you have created.
Author: Precious Beauties
• 2:31 PM
Supplies Needed:
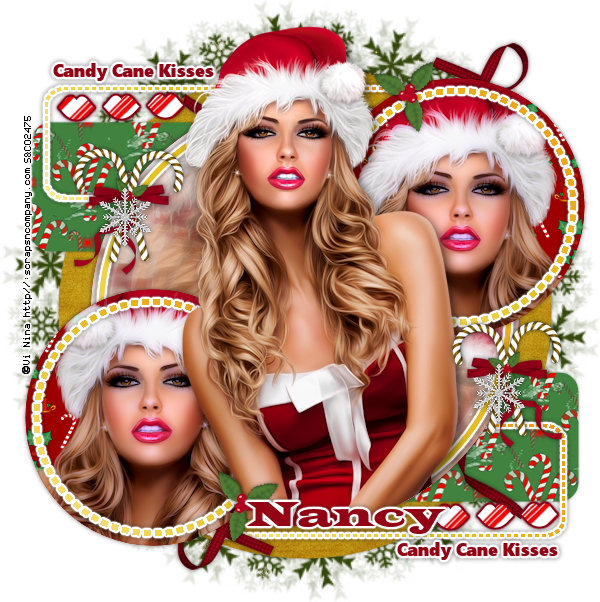
Tube: I'm using one by Vi Nina found at S&Co
Template: Candy Kisses2 by Flaminsal found here
Scrap Kit: Tis The Season by Scraps Dimensions found here
(I was informed that the kit is no longer available so you can get it here)
Plugin: Xero – Porcelain (optional)
Plugin: Filters Unlimited 2 – Special Effects Dark Blur and Shiver (optional)
Plugin: MuRa’s Meister – Wallpaper (rotate) Optional
Plugins: Eye Candy 4000 – Gradient Glow (optional)
My Supplies: Word art, mask layer and backgrounds (optional) found here

Open the template, duplicate and close the original. Open the background layer at the bottom.

Select Large Circle, go to Selections - Select All - Float - Defloat.
Copy and paste a paper of choice above the selected layer. Position to your liking. Go to Selections - Invert and hit delete on the keyboard. Delete the template layer. Apply a drop shadow.

Repeat the above steps for the remaining template layers. If you like you can use the backgrounds that I shared with my supplies for the long rectangles.

Select the background for the circle in the lower left hand side, go to Selections - Select All - Float - Defloat. Copy and paste the tube as a new layer above the background. Position to your liking. Go to Selections - Invert and hit delete on the keyboard. Do the same thing for the circle in the upper right hand side, you may want to mirror the tube.  Select one of the tubes and apply Xero - Porcelain using the default settings, do the same for the remaining tube. You can use any plugin you like for here if you prefer that instead.

Copy and paste the tube as a new layer above the large circle in the center. Position to your liking. Go to Plugins – MuRa’s Meister – Wallpaper (rotate), I used these setting:
Random
Wraparound
Normal
Number:20
Select the background for the large circle in the center, go to Selections - Select All - Float - Defloat. Select the wallpaper layer, go to Selections – Invert and hit delete on the keyboard. Go to Plugins – Filters Unlimited – Special Effects – Blur Darkness, using the default settings. Using the same Plugin apply Shiver, you can find this in the Special Effects as well.

Open Candy Cane1, resize by 20 percent. Copy and paste as a new layer. Place in the upper left hand side on the edge of the large circle. Apply a drop shadow. Duplicate and mirror, place in the lower right hand side on the edge of the large circle.

Open Holly2, resize by 15 percent. Copy and paste as a new layer. Position behind the circle layers on the left hand side. Apply a drop shadow.

Open Ribbon04, resize by 60 percent, mirror. Copy and paste as a new layer. Position on the right hand side behind the small circle layer. Apply a drop shadow. Duplicate and flip, do the same thing for the left hand side.

Open snowflake1, resize by 20 percent. Copy and paste as a new layer. Position to your liking, I placed mine near the candy canes. Apply a drop shadow. You can add as many as you like.

Open the mask layer included in my supplies. Copy and paste as new layer. Move this to the layer right above the background layer.

Open word art included in my supplies, copy and paste as a new layer. Position above the dotted line on the left hand side. Duplicate and do the same for the dotted line on the right.

Add any copyrights and your name. Crop, resize if desired. Save as a PNG (close background first).

Thank you for trying one of my tuts, I hope you have enjoyed yourself and I look forward to having you back here again!! I would love to see what you have created.
Author: Precious Beauties
• 8:55 AM
Supplies Needed:
Tube of choice, I am using a FTU tube by Lia which I have included in my supplies
Template 14 by Lacarolina
My supplies (everything to make tag) here

Open the template, duplicate and close the original. Delete the copyright and the black circles.

Select one of the template layers, go to Selections - Select All - Float - Defloat.

Use either a gradient from the tube or a paper of choice, if using a gradient add a new layer above the selected layer and flood fill this layer with the gradient. Go to Selections - Invert and hit delete on your keyboard. If you are using a paper, copy and paste as a new layer above the selected layer, position and resize if needed. Go to Selections - Invert and hit delete on your keyboard. Delete the template layer and add a drop shadow or gradient glow.

Repeat this for all remaining template layers.

Copy and paste the mask included in my supplies as a new layer above the white background.

Copy and paste the background image below the frames, select the frame background that you changed, go to Selections - Select All - Float - Defloat.

Select the background image that you just added from my supplies, go to Selections - Invert and hit delete on your keyboard. You can always mess around with the Blend mode to see what looks best to you.

Copy and paste the Wreath included in my supplies, place ay the top just above the frames. Apply a small drop shadow.

Copy and paste the Hanging Ball included in my supplies, place on top of the bracket on the left. Line it up so it looks like it hanging from it. Apply a drop shadow. Duplicate, mirror and place on the bracket on the right.

Copy and paste the Santa Bag included in my supplies, place on the left hand side just below the wreath. Apply a drop shadow.

Copy and paste the Gifts included in my supplies, place across the bottom of the tag. Apply a drop shadow.

Copy and paste the Balls and Holly included in my supplies, place on the left hand side right before the last gift. Apply a drop shadow.

Copy and paste the Ball on Ribbon included in my supplies, place on the right hand side of the balls you just added. Duplicate, mirror and place on the right hand side. Apply a drop shadow.

Copy and paste the tube as a new layer, resize as desired, place on the right hand side next to the Christmas balls. Apply a drop shadow.

Add any copyrights and your name.

Crop, resize if desired. Save as a PNG. (don’t forget to close the white background)

I hope you have enjoyed using one of my tuts, I would love to see what you have created.
Author: Precious Beauties
• 8:20 AM
Supplies Needed:
Tube of choice (full body and close-up), I am using one of Ismael Rac found here
Scrap kit Christmas Blog Train by Seachell
Template 17 by Sapphire
My supplies (Word Art) here
Mask of choice

Open template, duplicate and close original. Delete copyright, and word art. Resize all layers by 90 percent. Resize canvas by 700x700.

Select Rounded Rectangle, go to Selections - Select All - Float - Defloat.

Open paper of choice, copy and paste above the selected layer. Resize if desired. Go to Selections - Invert and hit delete on your keyboard. Delete template layer, apply drop shadow.

Repeat above steps for remaining template layers.

Apply drop shadows to all frames and snowflakes.

Select Word art by Sapphire. Change Blend Mode to Luminance (Legacy) and Opacity to 76.

Copy and paste close-up inside the large circle. Resize if needed. Erase any of the tube out past the circle. Apply drop shadow. Change Blend Mode to Luminance (Legacy).

Copy and paste full body inside the small circle, mirror. Resize if needed. Erase any of the tube out past the circle. Apply drop shadow. Change Blend Mode to Luminance (Legacy).

Copy and paste full body tube as a new layer in the center of the template. Apply drop shadow.

Open paper of choice, paste as a new layer above the white background layer. Apply the mask to this layer. Delete mask layer, merge group.

Open Bow 02 and resize by 20 percent. Copy and paste as a new layer in the top left hand corner of the rectangle. Apply drop shadow.

Open Xmas Ball 03 and resize by 25 percent. Copy and paste as a new layer. Place on the left hand side at the top of the rectangle. Apply drop shadow.

Open Brad 01 and resize by 20 percent. Copy and paste as a new layer. Place on the bottom left hand side overlapping the circle. Apply drop shadow. Duplicate, place at the top right hand side on top of the large circle.

Open Swirl 02 resize by 60 percent. Copy and paste as a new layer. Place in the upper right hand corner above the large rectangle. Apply drop shadow. Duplicate, mirror and flip.

Copy and paste Word Art included in my supplies. Place to your liking. Apply drop shadow.

Open Star Glitter 02 resize by 60 percent. Copy and paste as a new layer. Place on the left hand side next to the rectangle. Apply drop shadow. Duplicate, place on top of the word “Driven”.

Open a paper of choice, paste as a new layer above the background layer. Apply the mask to this layer. Delete the mask layer, merge group.

Add any copyrights and your name.

Crop, resize if desired. Save as a PNG.

I hope you have enjoyed using one of my tuts. I would love to see what you have created.
Author: Precious Beauties
• 11:33 AM
Supplies Needed:
Tube of choice, I am using Lix found at PTE
Scrap kit Silent Night by Designs by Vaybs
Template CM Temp6-Saph found at Creative Misfits
My supplies (mask and candy canes) here

Open the template, duplicate and close the original. Delete the copyright and the candy canes. Resize all layers by 90 percent. Resize the canvas 700 x 700. Flood fill the white background with white.

Select the oval, go to Selections - Select All - Float - Defloat.

Copy and paste a paper of choice above the selected layer. Position and resize if needed, go to Selections - Invert and hit delete on your keyboard. Delete the template layer. Apply a drop shadow to the paper.

Repeat this for the remaining template layers.

I colored the word art using colors from my tube, this is up to you. I used the Change To Target tool to do this.

Copy and paste the mask included in my supplies above the white background as a new layer.

Open Element (Tree), copy and paste as a new layer. Place in the center of the tag. Apply a drop shadow.

Open Element 2 and resize by 50 percent. Copy and paste on the left hand side behind the tree, position so they can be seen, delete any of the star or string out past the frame. Apply a drop shadow. Duplicate, mirror and place on the right hand side.

Open Element 77 and copy and paste as a new layer, place above the mask layer on the left hand side. Apply a drop shadow.

Open Element 79 and copy and paste as a new layer, place above the mask layer on the right hand side. Apply a drop shadow.

Copy and paste the candy canes included in my supplies, place on the left hand side just below the word art “its beginning to look a lot like Christmas”. Apply a drop shadow. Duplicate, mirror, reposition if needed.

Open Element 37 and resize by 50 percent. Copy and paste as a new layer, place in front of the candy canes on the left hand side, make sure the candy canes and the gift is behind the “Christmas” word art. Apply a drop shadow.

Open Element 38 and resize by 50 percent. Copy and paste as a new layer, place in front of the candy canes on the right hand side.  Apply a drop shadow.

Open Element 43 and resize by 40 percent. Copy and paste as a new layer in front of the word art “Christmas”. Apply drop shadow.

Open Element 45 and resize by 20 percent. Copy and paste as a new layer in front of the ribbon. Apply a drop shadow.

Copy and paste your tube as a new layer. Place about in the center of the tree behind the word art. Apply a drop shadow.

Add any copyrights and your name.

Crop, resize if desired. Save as a PNG.

I hope you have enjoyed using one of my tuts, I would love to see what you have created.
Author: Precious Beauties
• 10:50 AM
Supplies Needed:
Tube of choice, I am using Jessica Dougherty, you can find her at CDO
Scrap kit Gothy Xmas by Felice Original
My supplies (glitter and flower ring) here

Open a new image 700 x 700 with a white background.

Open Round Lace Frame and resize by 60 percent. Copy and paste as a new layer. Click inside the frame with the Magic Wand, go to Selections - Modify - Expand by about 3.

Copy and paste a paper of choice below the frame layer. Position and resize if needed, go to Selections - Invert and hit delete on your key board.

Apply a drop shadow to the lace frame.

Copy and paste the glitter included in my supplies below the frame layer.

Copy and paste the flower ring included in my supplies as a new layer. Place on top of the lace frame. Apply a drop shadow.

Open Xmas Tree and resize by 60 percent. Copy and paste as a new layer. Place in the center of the tag. Apply a drop shadow.

Open Candy Cane and resize by 20 percent. Copy and paste as a new layer. Place on the left hand side on top of the lace frame. Apply a drop shadow.

Open Frosted Berries 2, resize by 20 percent. Copy and paste as a new layer. Place just beside the candy cane about half way down. Apply a drop shadow. Duplicate, mirror and place on the right hand side on top of the lace.

Copy and paste the tube as a new layer. Place on the right side of the tree, resize if needed. Apply a drop shadow.

Open Gift Boxes 2 and resize by 30 percent. Copy and paste as a new layer. Place on the right hand side next to the tube. Apply a drop shadow.

Open Shoe, resize by 15 percent. Copy and paste as a new layer. Place in front of the boxes, apply a drop shadow.

Open Gothy Xmas Hat 2, resize by 20 percent. Copy and paste as a new layer. Place in front of the tree at the bottom. Apply a drop shadow.

Add any copyrights and your name.

Crop, resize if desired. Save as a PNG.

I hope you have enjoyed using one of my tuts, I would love to see what you have created.
Author: Precious Beauties
• 10:16 AM
Supplies Needed:
Tube of choice, I am using one of Jessica Dougherty purchased from CILM but you can now find her at CDO
Scrap kit Noel by Felice Original
My supplies (mask and background) here

Open a new image 700 x 700 with a white background.

Open Glitter Frame and resize by 70 percent. Copy and paste as a new layer. Apply drop shadow.

Open and paste the mask background included in my supplies as a new layer.

Open Stocking 3 and resize by 25 percent. Copy and paste as a new layer. Place on top of the glitter frame on the right hand side, apply a drop shadow. Duplicate, mirror and move to the left hand side placing on top of the glitter.

Open Xmas Candle 2, copy and paste as a new layer in the center of the glitter frame. Apply a drop shadow.

Copy and paste the tube in the center of the tag in front of the tree. Apply a drop shadow.

Open Husky and resize by 30 percent, copy and paste as a new layer, place in front of the tube. Apply a drop shadow.

Open Holly and resize by 15 percent. Copy and paste as a new layer, place somewhere around the husky. Apply drop shadow.

Open Gift Box and resize by 15 percent. Copy and paste as a new layer placing on the left hand side beside the tree and behind the tube some. Apply a drop shadow, duplicate, mirror and place on the right side.

Open Silver Star and resize by 12 percent. Copy and paste as a new layer, place at the top of the tree. Apply a drop shadow.

Open Ball Blue, Ball Silver and Ball Beige, resize them by 10 percent. Copy and paste to your liking on the tree. Apply drop shadow.

Add any copyrights and your name.

Crop, resize if desire. Save as a PNG.

I hope you have enjoyed using one of my tuts, I would love to see what you have created.
Author: Precious Beauties
• 10:39 PM
Supplies Needed:
Tube of choice, I am using one of Suzanne Woolcott purchased from here
Scrap kit Waiting For Santa (was PTU now FTU) by Cinnamon Scraps
You can download the scrap kit here, she no longer has it on her site
All Copyrights remain with the original designer
My supplies (mask, frame background, word art) here

Open a new image 700 x 700 with a white background.

Copy and paste the mask layer included in my supplies as a new layer.

Open Frame 1 and resize by 90 percent. Copy and paste as a new layer. Apply a drop shadow.

Copy and paste the frame background included in my supplies as a new layer, move this layer below the frame layer.

Open Twisted Ribbon 1 and resize by 80 percent. Copy and paste as a new layer. Position on the left side on top of the frame. Apply a drop shadow. Duplicate and mirror, reposition if needed.

Open Tree 1 and resize by 60 percent. Copy and paste as a new layer, place inside the frame on the right hand side. Apply a drop shadow.

Copy and paste the tube as a new layer, resize if needed. Place inside the frame in the center. Apply a drop shadow. Make sure this layer is above the tree layer.

Open Reindeer, duplicate, resize one by 50 percent and the other by 40 percent, copy and paste the larger deer as a new layer. Place on the left hand side inside the frame. Apply a drop shadow. Copy and paste the smaller deer as a new layer, position to the right inside the frame. Apply a drop shadow.

Open Label 2 and resize by 50 percent. Copy and paste as a new layer. Place at the bottom of the frame in the center. Apply a drop shadow.

Open Twisted Ribbon 2 and resize by 80 percent, go to Image - Rotate left, mirror. Copy and paste as a new layer. Place in front of the Santa label. Apply a drop shadow.

Open Folded Ribbon and resize by 50 percent. Copy and paste as a new layer. Place in front of the ribbon we just added. Apply a drop shadow.

Open Holly 2 and resize by 25 percent. Copy and paste as a new layer, place above the tag on the folded ribbon we added at the bottom of the tag. Apply a drop shadow.

Open Candle and resize by 20 percent. Copy and paste as a new layer. Position to the left beside the tag on the folded ribbon. Apply a drop shadow. Duplicate and mirror, reposition if needed.

Open Holly 1 and resize by 25 percent. Copy and paste as a new layer. Place in the center of the ribbon on the left hand side. Apply a drop shadow. Duplicate and mirror, reposition if needed.

Copy and paste the word art “I believe in” included in my supplies as a new layer, place at the top of the tag.

Copy and paste the word art “Santa” included in my supplies as a new layer. Place in the center of the tag attached to the folded ribbon at the bottom of the tag.

Add any copyrights and your name.

Crop, resize if desired. Save as a PNG.

I hope you have enjoyed using one of my tuts, I would love to see what you have created.
Author: Precious Beauties
• 10:32 PM
Supplies Needed:
Tube of choice, I am using one of Gennadity Koufay purchased from MPT
Scrap kit Jingle Bells by Seachell
My supplies here (mask, background image)
Labels here

Open a new image 700 x 700 with a white background. Don’t worry about the size right now we will be cropping later.

Copy and paste the mask included in my supplies as a new layer.

Open Window and paste as a new layer.

Open a paper of choice and paste as a new layer below the window. Erase any of the paper out past the window.

Copy and paste the image background from my supplies, position to your liking.

Open Tree and resize by 60 percent, copy and paste as a new layer inside the window. Move To the left, erase any of the tree that’s out past the window. Apply a drop shadow.

Copy and paste the tube as a new layer, place beside the tree on the right hand side. Resize if needed. Apply a drop shadow.

Open Bow 6, resize by 40 percent. Copy and paste as a new layer. Place at the top of the window in the center. Apply a drop shadow.

Open Flower 1 and resize by 20 percent. Copy and paste as a new layer. Place in the center of the window. Apply a drop shadow.

Open Flower 2 and resize by 15 percent. Copy and paste as a new layer, place in the center of the green flower we just added. Apply a drop shadow.

Open Silver Fur and resize by 50 percent. Copy and paste as a new layer, place at the bottom of the window, move this layer below the window layer. Position so that the branch is sticking out past the window frame. Apply a drop shadow. Duplicate and mirror. Duplicate again and this time move down to the very bottom of the window sill. Do this until you have branches on both sides.

Open Icicles and resize by 80 percent. With the Selection tool select a portion of the icicles, copy and paste as a new layer. Position at the bottom of the window sill so the look like they are attached. Duplicate and place along the sill, do this until you have what you like.

Open a the labels included in my supplies, choose one you like. Resize to your liking. Go to Image - Free Rotate and rotate 25 degrees left. Copy and paste as a new layer at the top left of the tag. Apply a drop shadow.

Go to Image - Resize all layers by 90 percent.

Add any copyrights and your name.

Crop and resize again if desired. Save as a PNG.

I hope you have enjoyed using one of my tuts. I would love to see what you have created.
Author: Precious Beauties
• 10:25 PM
Tube of choice, I am using one by Unholy Vault Designs purchased at MPT, they are now at PTE
Scrap kit Christmas Past by Nette’s Nightowl Works
My supplies (mask, background, flower circle) here

Open a new image 700 x 700 with a white background.

Copy and paste the mask included in my supplies as a new layer.

Open wreath and resize by 50 percent, copy and paste as a new layer.

Copy and paste the background image included in my supplies as a new layer.

Copy and paste the flower circle included in my supplies as a new layer.

Copy and paste the frame included in my supplies as a new layer.

Copy and paste the tube as a new layer inside the frame. Erase any of the tube that’s out past the frame. Resize if needed. Apply a drop shadow.

Open birdsonalimb and resize by 30 percent. Copy and paste as a new layer. Place at the top of the tag behind the tube, apply a drop shadow.

Open flake ribbon and resize by 60 percent. Copy and paste as a new layer. Place on top of the frame near the bottom. Erase any of the ribbon that’s out past the frame.

Open ballflower, duplicate and resize by 20 and by 25 percent. Copy and  paste the smaller one as a new layer. Place on the right hand side below the frame. Apply a drop shadow. Duplicate and mirror. Place a little lower then the one on the right. Copy and paste the larger one as a new layer. Place on top of the frame on the right hand side. Apply a drop shadow. Duplicate, mirror.

Open Bambi and resize by 25 percent, mirror. Copy and paste as a new layer. Place on the left hand side at the bottom of the tag. Apply drop shadow.

Open westie and resize by 15 percent. Copy and paste as a new layer. Place on the right side in front of the deer. Apply drop shadow.

Open penguin and resize by 15 percent. Copy and paste as a new layer. Place on the right side next to the westie. Apply drop shadow.

Open bulb and resize by 6 percent. Copy and paste as a new layer. Place on the left hand side hanging off one of the branches. Apply drop shadow, duplicate, move to the right and position hanging off of a branch.

Open poinsettia and resize by 10 percent. Copy and paste as a new layer. Place in front of the deer. Apply drop shadow, duplicate and place on top of the ballflower stem on the left hand side. Duplicate, mirror and place on top of the ballflower stem on the right.

Add any copyrights and your name.

Crop, resize if desired. Save as PNG.

I hope you have enjoyed using one of my tuts, I would love to see what you have created.